|
What are the plate Modes?
Other sites give lots of information on how to see the patterns that arise when a plate of any shape is vibrated at one frequency. Have a look at the Really Useful Links page.
The mode lines were originally discovered by a Mr. Chladni. His patterns of vibrating plates are well documented: have a look for instance at this UNSW site, and look at Chladni patterns for Violin plates ..... or look on on YouTube. This Ernst Chladni(1756-1827) was a German physicist, and is known as the ‘father of acoustics’.
What they tell us
The Modes, particularly Modes 1, 2 and 5, tell us about important characteristics of the wood :
- its bendability (speed of sound) across the grain is mostly ‘measured’ by Mode 2, and
- the speed of sound or ‘bendability’ along the grain is mostly ‘measured’ by Mode 5.
If we get these under control (i.e. known), then we are ‘copying’ what Sr. Stradivari did hundreds of years ago, and he knew that if he made a plate a particular way then an excellent violin would result.
By setting the Modes 2 and 5 to ‘standard’ frequencies, just as we make all the other dimensions of a violin completely standard with a Strad or Amati model, we control at least 2 of the 4 key body resonances of a violin. These 4 key resonances have a profound effect on the tone of a violin.
Historically speaking
The first reference I can find to these ‘Modes’ and ‘nodal lines’ on violin fronts and backs is in a Victorian book on violin making of more than 130 years ago: “Violin - Making: as it was and is” by Ed. Heron-Allen, published 1885-6. The author studied under (one of the) Georges Chanots, probably in London or Manchester 1.
Here is a webpage at UNSW that shows these modes of vibration.
Where to hold a plate to hear the tap-tones
Measuring the tap tone frequencies of interest (Modes 2 and 5, and possibly also Mode 1) takes only a couple of minutes, and involves no tuning forks or loudspeakers. The pictures below will show where to hold the plate: the belly or the back. You will only need a stick microphone, a computer runing ‘Audacity’ software and a fingertip or knuckle.
Firstly a violin plate needs to be held at any point on a nodal line, where the vibration amplitude at a selected resonant frequency is zero.
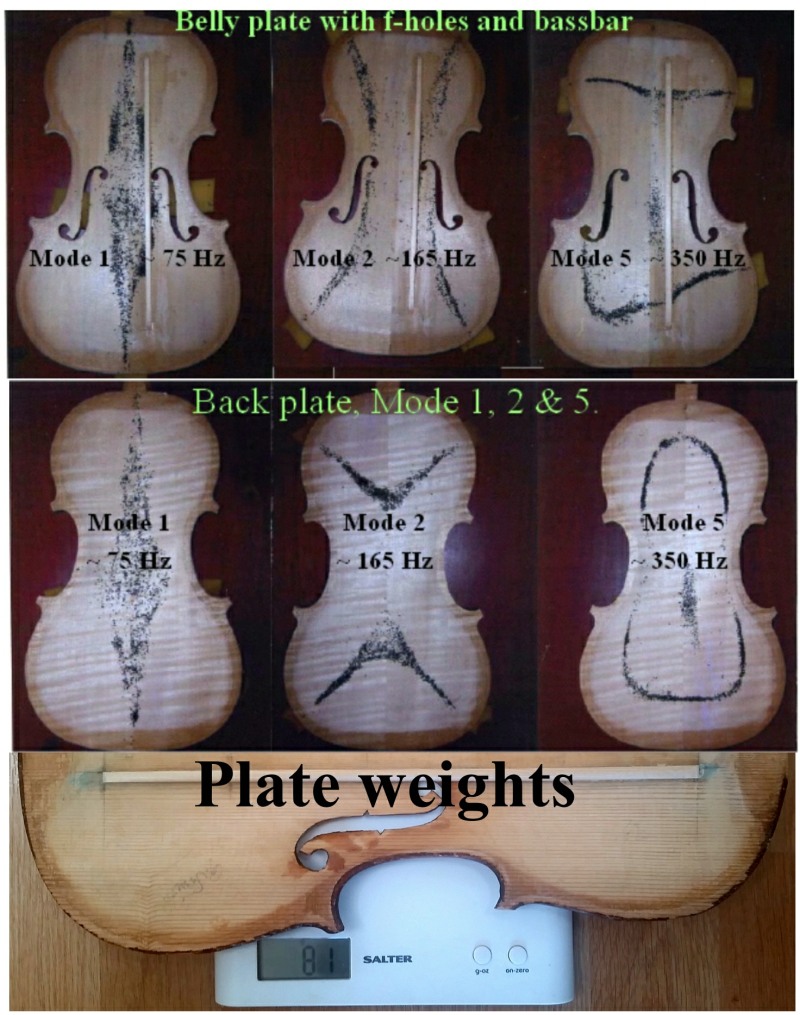
To the right (you can click on them to enlarge the pictures) are the results of an experiment John McLennan did in 2005 by putting tea leaves onto a violin plate and then shake the plate at just one frequency using a loudspeaker located under the plate. The tea leaves then pile up in the areas of the plate that vibrate the least or not at all, and these areas or lines are the nodal lines. The upper picture is of a belly plate vibrating at 3 very particular frequencies that cause strong resonances in the plate. There are more resonances, dozens of them at higher frequencies too, but the 2 freque located under the plate. The tea leaves then pile up in the areas of the plate that vibrate the least or not at all, and these areas or lines are the nodal lines. The upper picture is of a belly plate vibrating at 3 very particular frequencies that cause strong resonances in the plate. There are more resonances, dozens of them at higher frequencies too, but the 2 freque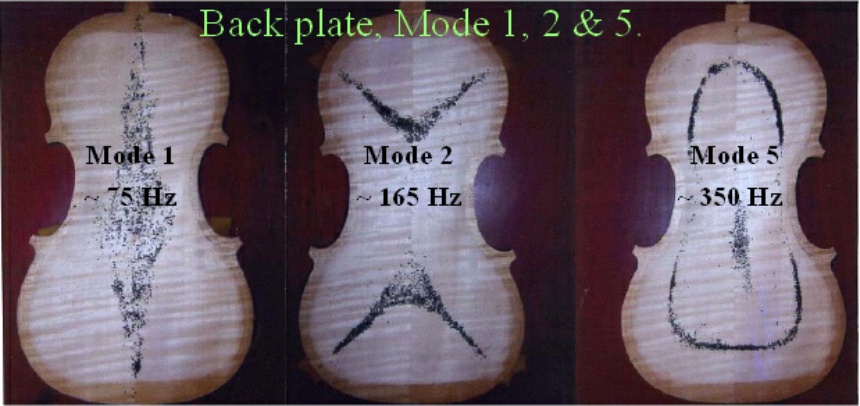 ncies that are of particular interest to us are Mode 2 (about 165 Hz) and Mode 5 (about 350 Hz). ncies that are of particular interest to us are Mode 2 (about 165 Hz) and Mode 5 (about 350 Hz).
The lower picture is of a back plate resonating at similar frequencies and again shows the nodal lines where the plate does not move.
What is so important about these lines is that if you hold the plate with your fingers anywhere on that line and tap the plate almost anywhere else then the plate will try and resonate at all possible frequencies (!) but most importantly any resonant frequency that does not have a node line passing through the point where the plate is held will be damped immediately! So all you are left with is the plate resonating at that one frequency that is selected by where you hold the plate!
When I hold and tap a plate (see photos below) I visualise the Modal lines and take hold of the plate somewhere on a nodal line and tap it with a finger tip or knuckle.
Now Mode 2 is called the ‘X’ mode as the nodal lines are shaped surprisingly like an ‘X’ - useful to help remember, but the ‘X’ is two back-to-back C’s on a belly!
Mode 5 is called the ring tone, as the black nodal lines are ring or ‘O’ shaped, particularly on the back plate. The front’s or belly’s (black) nodal lines are more like a pair of wavy brackets, one above the other, that extend right to the edges as shown in the picture above.
Exactly where to hold a plate
The ‘normal’ point to hold a plate is in the middle of the upper bout, as if the plate had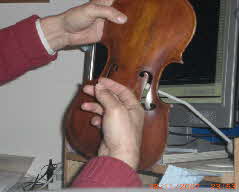 an ‘eye’ there as is the picture above. Importantly, holding here allows both Modes 2 and 5 to resonate when the plate is tapped, and suppress all the other Modes (and there are lot!). Their nodal lines do not pass through that point. I do also use other points right on the plate edge that allow only one tap tone to resonate like the upper corner for Mode 5, and choosing that an ‘eye’ there as is the picture above. Importantly, holding here allows both Modes 2 and 5 to resonate when the plate is tapped, and suppress all the other Modes (and there are lot!). Their nodal lines do not pass through that point. I do also use other points right on the plate edge that allow only one tap tone to resonate like the upper corner for Mode 5, and choosing that 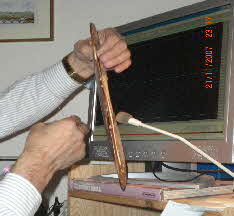 h ol di n g p oi nt d a m p s al l other modes. Experiment, play around! You will soon find where the best holding point is if you hold the plate up to your ear, and listen where the mic should be. I warn you: you will look ridiculous. h ol di n g p oi nt d a m p s al l other modes. Experiment, play around! You will soon find where the best holding point is if you hold the plate up to your ear, and listen where the mic should be. I warn you: you will look ridiculous.
Where to tap a plate, and what with
I usually tap the plate right in the middle (the bridge or soundpost position) for Mode 5, and at an edge (C - bout) for Mode 2.
The tip or pad of the first or second finger works well for Mode 2, and the knuckle for Mode 5. I’m using the knuckle here. You can use the eraser on the end of a pencil: it gives a higher Mode 5 and also many higher Modes too.
Using a Smart-Phone.
 You can use your smart phone with the right app such as AudioTool, Spectroid, or Audizr, or Spectrum RTA: there are over a dozen free Audio Analyser [FFT] apps available to do it! You can use your smart phone with the right app such as AudioTool, Spectroid, or Audizr, or Spectrum RTA: there are over a dozen free Audio Analyser [FFT] apps available to do it!
It takes me a minute or so to measure the tap tones of a violin plate: it is particularly quick to use a smart-phone. You put it on a desk edge with microphone outwards, set “Max. hold” function on the 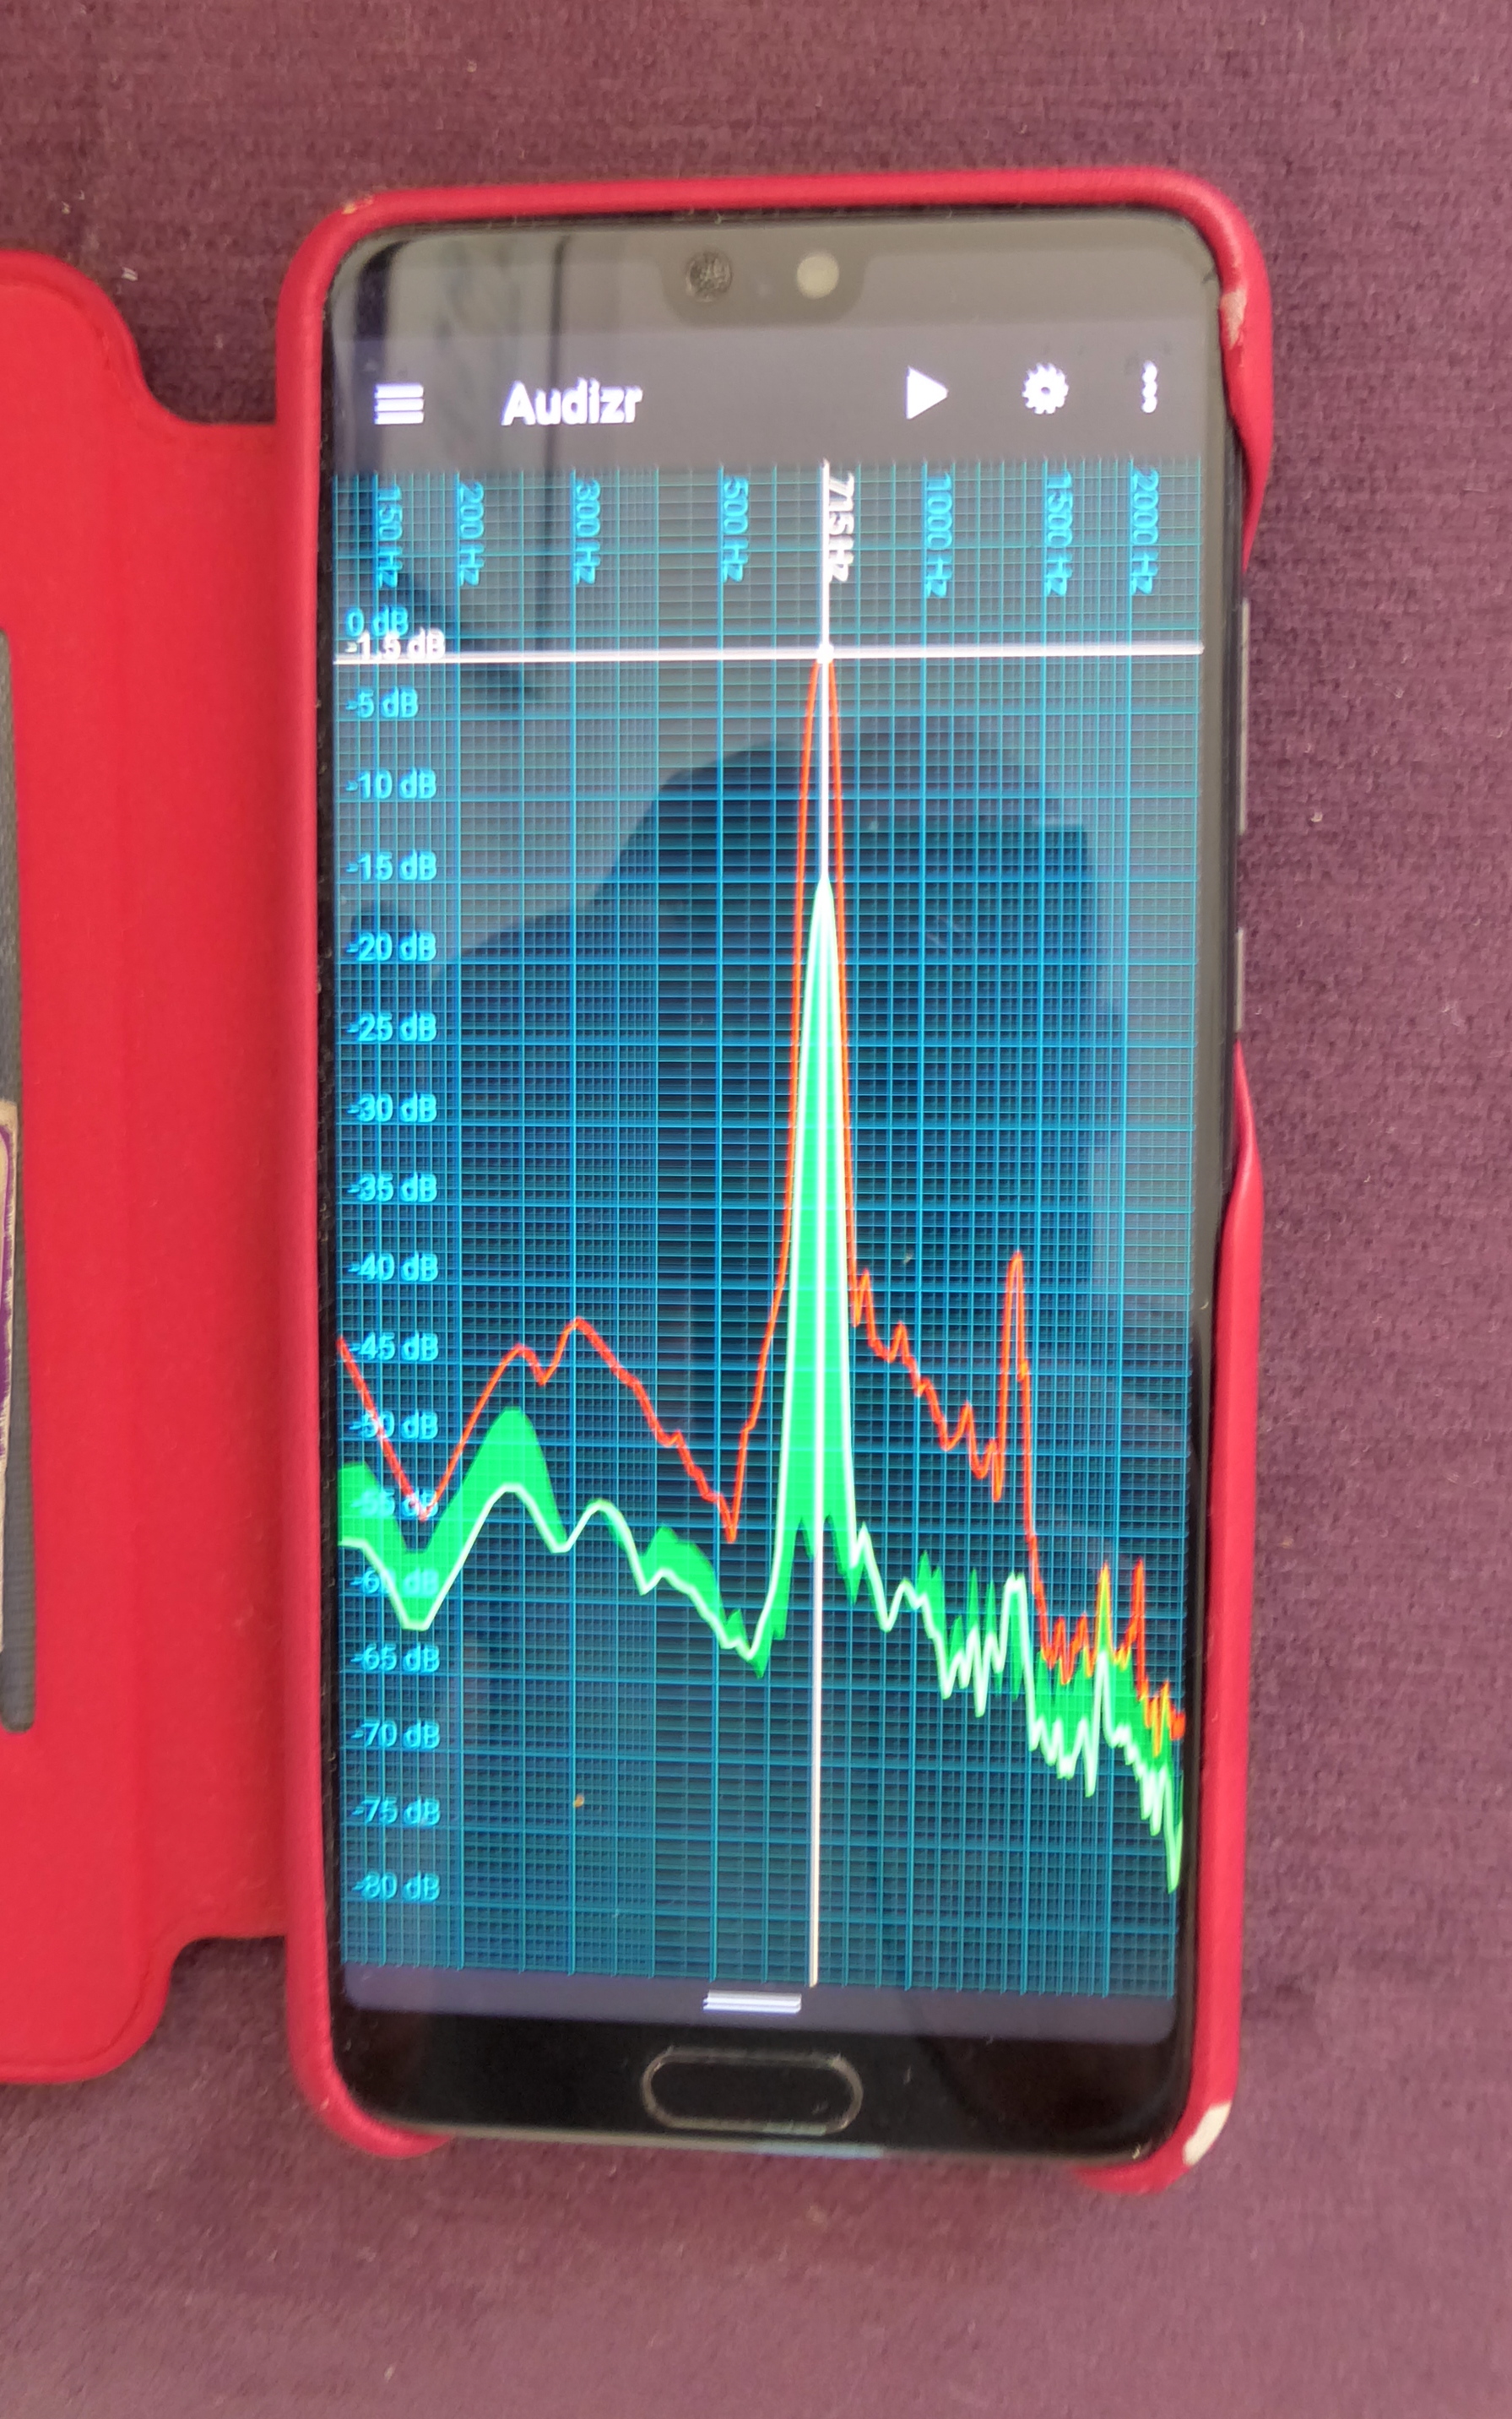 smart-phone and and tap the violin plate near it - and that’s it. A typical screen shot is shown below: click on it. smart-phone and and tap the violin plate near it - and that’s it. A typical screen shot is shown below: click on it.
The red line shows the “maximum hold” peak at 715 Hz (I whistled!) and will show the resonance peaks of the violin plate you hold near it.
You will need to look for peaks in the range 150-200 Hz for Mode 2 and 300-400 Hz for Mode 5.
Where to put the computer microphone.to measure tap tones.
The mic, preferably one on a ‘stick’, must be placed close to (1 - 2 inches away) from an anti-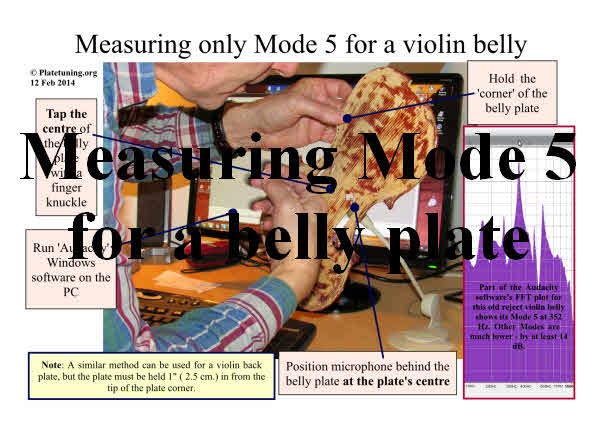 node. The anti-node is in the middle of the plate for Mode 5, and at one edge (C-bout) and at the bottom block position for Mode 2: have a look at the pictures. node. The anti-node is in the middle of the plate for Mode 5, and at one edge (C-bout) and at the bottom block position for Mode 2: have a look at the pictures.
With the mic at the centre of the plate, Mode 5 will be strong (as there’s an anti-node there), and Mode 2 weaker. Actually a Mode 2 broad nodal line is there, but it is still picked up a bit. You can see this from the FFT pictures below. In one case I measured, there was no Mode 2 picked up by the mic at all - because of this nodal line (no vibration) down the centre line of the plate. I usually move the plate up during the tapping so the mic’s opposite the bottom block position to make sure Mode 2 is picked up and can be read out on the same computer FFT screen output.
Screen capture and dB’s
In the screen dump of the FFT (see later), Mode 5 is 15 dB above that of Mode 2 when the mic stays at the centre of the plate and it it tapped with a ‘harder’ object: a pencil eraser (on the pencil!) or the knuckle. I use the free Ashampoo ‘Magical Snap’ for screen capture, turning what’s on screen to a .jpeg picture file. Or use Photoscape (also free). I then paste the picture directly into Serif PhotoPlus (the ‘SE’ version is free) or into Photoscape!
“15 dB” here means about 8 times bigger in amplitude as dB’s are a logarithmic scale. Usually the Modes 2 and 5 are about the same strength on the FFT screen when you move the plate during tapping so the mic picks up Mode 5 at the centre, and Mode 2 around the bottom block position.
How to get and interpret the results: the tap tones of Modes 2 & 5
First you will need to download and install the Audacity software from the ‘Sourceforge’ download page. This is a superb, free PC program to record and analyze sound picked up by your PC microphone. I always use mono recording as there’s only one mic! There’s also a version for the Apple Mac.
-----------------------------------
Footnote 1:
There are some contradictions and “mistakes” especially on belly tap tone frequencies in “Violin - Making: as it was and is” by Ed. Heron-Allen, but amazingly, in re-reading I found a reference to Modes 2 and 5 tap tones visualised using sand, using a rosined bow drawn across the edge of the plate to excite or activate the modes. Chladni’s book on plate acoustics was in circulation a full 70 years (1787) before Mr. Heron-Allen was writing.
It's fascinating to think that he may himself have seen patterns in sand, as shown in the next column, as he drew a bow across the edge of a plate he was holding. This is on pages 132-133 of his book. He refers to Mode 2 as the “normal tone”, and believe it or not, refers to “nodal lines” in the tech. footnote on page 133. As a reality check, this is from 130+ years ago. What's new under the sun?
|
Now record the plate tap tones using this Audacity software by pressing the red button with the mouse pointer. This button is top left in the picture on the right - click on the picture to see it. I usually tap the plate in the right place about 10 times in 5 seconds.
Select the 2 silences at the either end of the waveform with the mouse left hand button pressed and delete them using the delete key. This leaves a good waveform to work with: you may need to adjust the mic sensitivity down so the mic is not overloaded.
Select all the recorded wavefor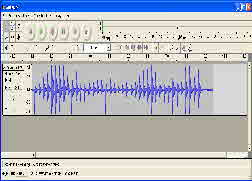 m left in the window using “Control + A” keys pressed simultaneously and go to the ‘Analyze’ option on the top line of the window and select the ‘Plot Spectrum’ menu item that drops down. This calculates the Fast Fourier Transform (the FFT) of the selected waveform: that is it shows all of the resonant frequencies or tap tones present in the sounds picked up my the microphone. m left in the window using “Control + A” keys pressed simultaneously and go to the ‘Analyze’ option on the top line of the window and select the ‘Plot Spectrum’ menu item that drops down. This calculates the Fast Fourier Transform (the FFT) of the selected waveform: that is it shows all of the resonant frequencies or tap tones present in the sounds picked up my the microphone.
You will need to enlarge the ‘Frequency Analysis’ window, and at the bottom left of the screen select ‘Spectrum’, 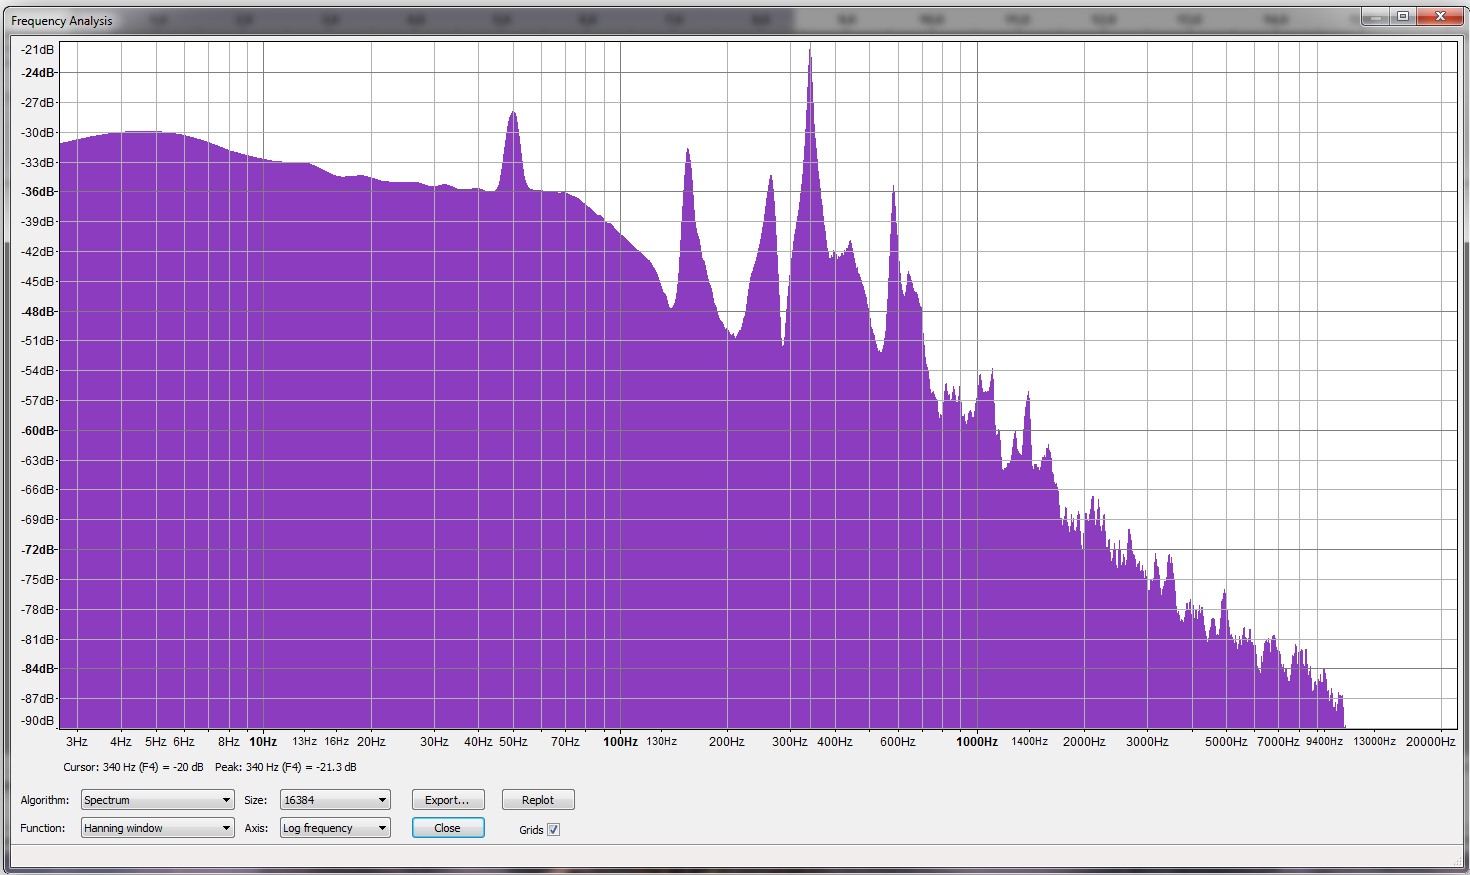 16,384 (the sample window size), Hanning window, and finally ‘log’ (or logarithmic) display. 16,384 (the sample window size), Hanning window, and finally ‘log’ (or logarithmic) display.
I’ve included 2 pictures (screen dumps) of typical Audacity windows, one above showing the waveform, and one right showing the FFT screen. Click on them for full size pictures.
In this example of a front (belly) with a good bassbar fitted, Mode 2 peak is at 150 Hz, and, also shown selected with the cursor is the 340 Hz of Mode 5. What’s so good about Audacity here is that the cursor pops automatically to the nearest peak and shows its frequency under the display, under the purple area bottom left. Be careful to read the ‘peak’ frequency on the right and not the ‘cursor’ frequency on the left ! Now write it down - I keep a small transparent folder for each violin to record all progress, results and calculations.
You can find instructions for using Audacity software here, or use a 10-part tutorial on YouTube here.
Audacity also allows the export of data to MS Excel (or an OpenOffice spreadsheet) to calculate the energy at various frequencies.. It’s shown as an ‘Export’ button, bottom right of the Freq. Analysis window, and allows a graph of amplitude v. frequency to be drawn in the spreadsheet using the ‘X-Y plot’ option.
You might like to look at Vojtech Blahout’s website on violin making too as it has some help on using Audacity to measure plate mode frequencies.
Strobe Tuners
A company called Peterson make a range of strobe tuners, best described on this YouTube video. The latest is the ‘StroboSoft’ PC software for about $50. Strobe tuning techniques have been in use since Lloyd A. Loar’s outstanding work in the 1920’s on the Gibson F4 (and F5) mandolin plate tuning. They have a flat or rather carved front and back plate. His work has encouraged plate tuning on all kinds of instruments in the USA ever since, as the F4 and F5’s from that era are truly the ‘strads’ of mandolins! Roger Siminoff is the current US guru on plate tuning, and has published several books.
The advantage of ‘strobe tuners’ is they allow rapid visualisation of the tap tone’s pitch, and also its harmonics: i.e. a frequency and all of its octaves. This may require a compressor (as used with guitars) to stretch the tap tone out.
So just what are these Modes?
What is Mode 2 or the X-Mode? and what is Mode 5 or the Ring-Mode? Here are the ‘tea leaf’ patterns that show up when the plates are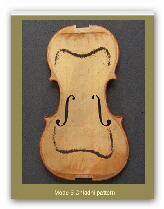 vibrated using a loudspeaker underneath at a particular frequency - the ‘tap tone’. It is a resonant frequency of the plate as a whole. vibrated using a loudspeaker underneath at a particular frequency - the ‘tap tone’. It is a resonant frequency of the plate as a whole.
On the left here is one of the excellent photos on Joseph Curtin’s website and shows the most important Mode in a belly plate, Mode 5, the ring tone. The black lines are the nodal lines on a violin belly vibrating in Mode 5 at about 350 Hz. The pictures below show Mode 2 in a front plate at about 170 Hz. Have a look too at a BBC web page here that uses “holographic interferometry” (!) to do the same thing - only even better!
These pictures show that when a plate, either the front or back of an instrument is vibrated at one constant frequency then fine sand, tea leaves, sawdust or glitter placed on it will move to areas of the plate that are not moving i.e. not vibrating. This only happens at particular resonan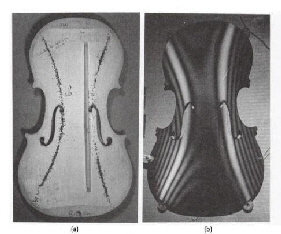 t frequencies, and finding those resonant frequencies is what this is all about. These lines of no motion are called the ‘nodes’, or in this case the ‘nodal lines’. Anti-nodes are where the motion is at a maximum. t frequencies, and finding those resonant frequencies is what this is all about. These lines of no motion are called the ‘nodes’, or in this case the ‘nodal lines’. Anti-nodes are where the motion is at a maximum.
In summary: The “nodal lines” are the black lines in the photos and videos where the plate does not vibrate at that particular frequency. So the plate can and must be held somewhere on a nodal line without affecting th e vibrating pattern of that Mode. e vibrating pattern of that Mode.
There is a good YouTube video by Jonathan McKinley (click on the picture left) that clearly shows plate modes 1, 2 and 5 vibrating as the tea leaves migrate to the lines of zero-vibration - the nodal lines of the violin plate as the vibrating frequency is gradually increased. Jonathan McKinley has photographed his violin parts here too: but his belly: Mode 2 is high, and Mode 5 low!
Understanding these Modes and their shapes is fundamental to understanding tap tones. You will need to know how to get these Modes vibrating. It was Carleen who first used a speaker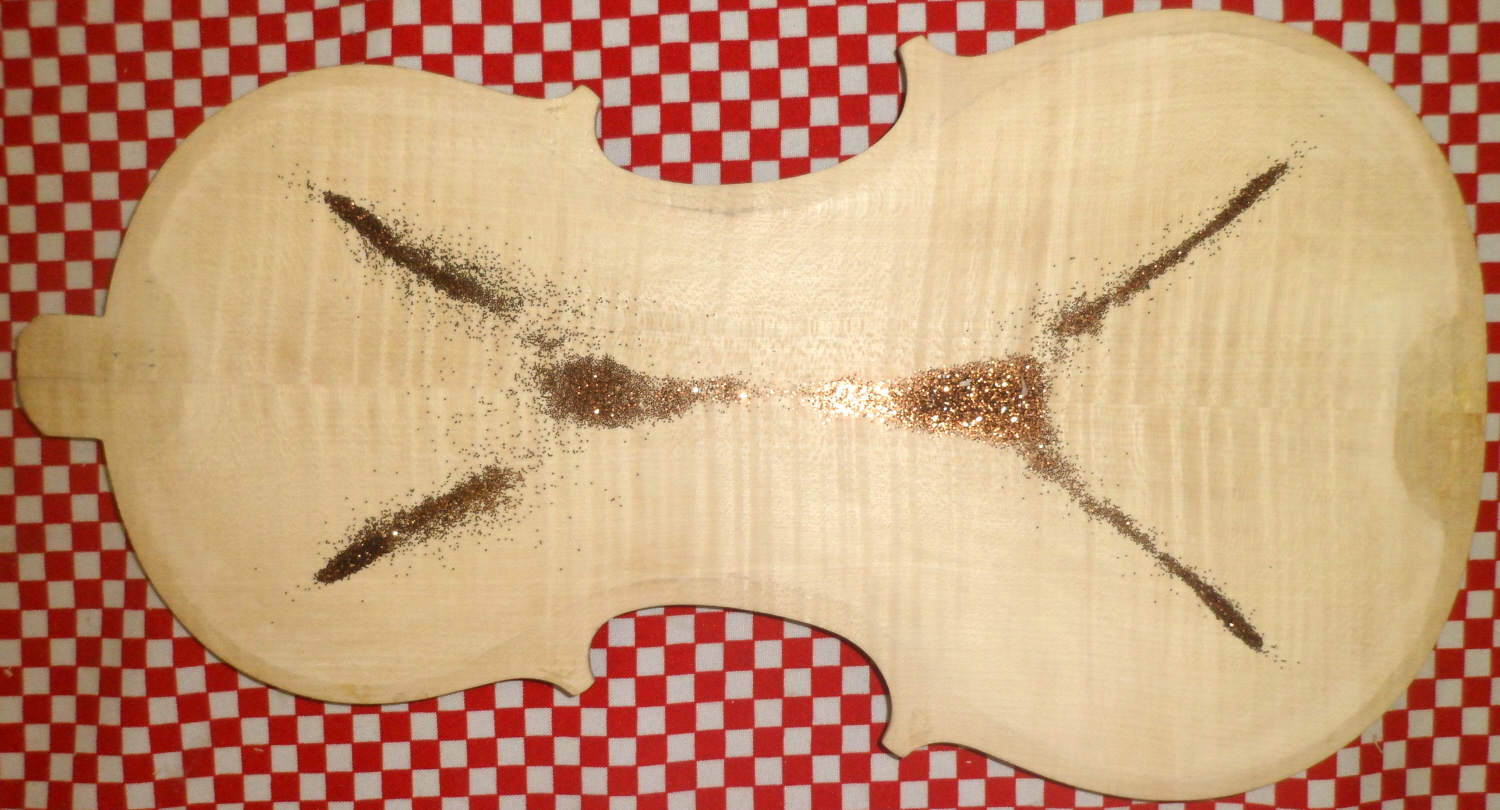 placed under a plate at an anti-node, and fed the ‘speaker at various frequencies until a glitter pattern showed up. placed under a plate at an anti-node, and fed the ‘speaker at various frequencies until a glitter pattern showed up.
These patterns are well illustrated by other website pages to be found in the “Really Useful Links” page. If you click on either these two glitter patterns you can see the nodal lines on a back plate that Alan Jhones from Brazil sent me.
Mode 2 is the one above,
and Mode 5 is below.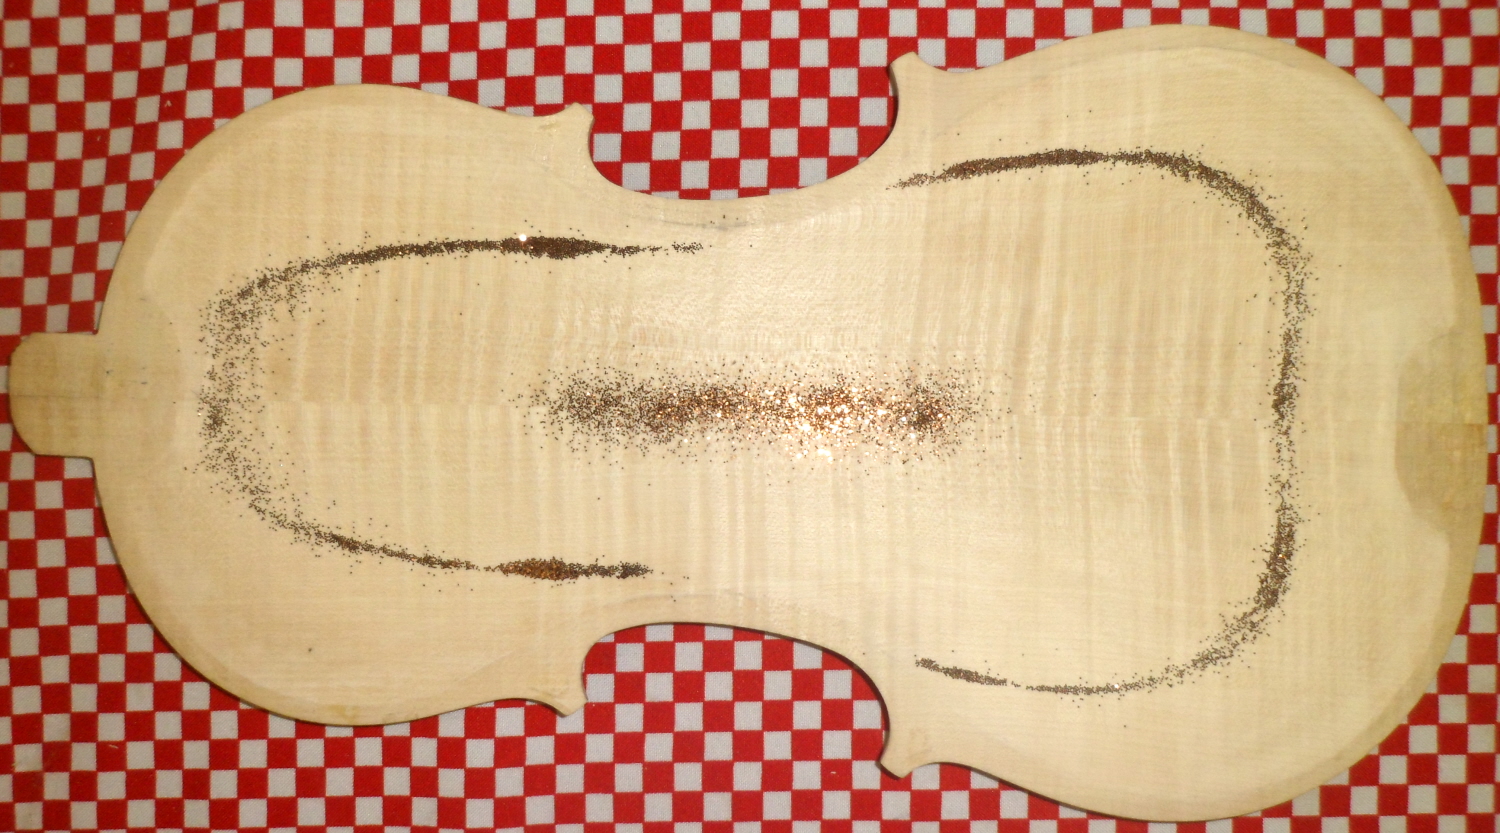
We can also get the plates vibrating by holding at a point on a nodal line, and tapping at an ‘anti-node’, or a point where the vibration is or will be a maximum: it works well, but there is information lost about the detailed shape of the nodal lines: Carleeen thought that is important.
Animations of plates vibrating
Borman Violins also shows some excellent and fascinating animations of violin and other plates here vibrating in situ on a violin and viola, made possible by the work of instrument maker George Stoppani.
This helps us understand how the vibration of the belly and back plates vibration modes while free (as we measure them) are linked to how they behave actually in a completed instrument.
Vibration modes of the completed violin
Getting the tap tones right for the plates will give you a very very good chance that the resonance modes of the completed violin body will be right - or at least similar to the world’s greatest violins! There is a direct link from the plate resonances to the resonances of the completed instrument. Have a look here for the resonances of the completed violin body ......
...but what tap tones don't tell us
Well you wont make a violin that sounds like a £15,000 violin using tap tones like this unless you are very, very, very, very lucky and at least prepared to let an expert choose the (costly) wood to start with. In particular tap tones are not good at reflecting what the edges of a violin plate are like. They are a whole different subject.
There is also another and much higher level of the art, experience and science that the master craftsman has that us mere mortals can only dream of.
You can glimpse some of it in the work some people are doing to actually listen openly to what violins sound like: there's a discussion here on maestronet for instance, which I’ve 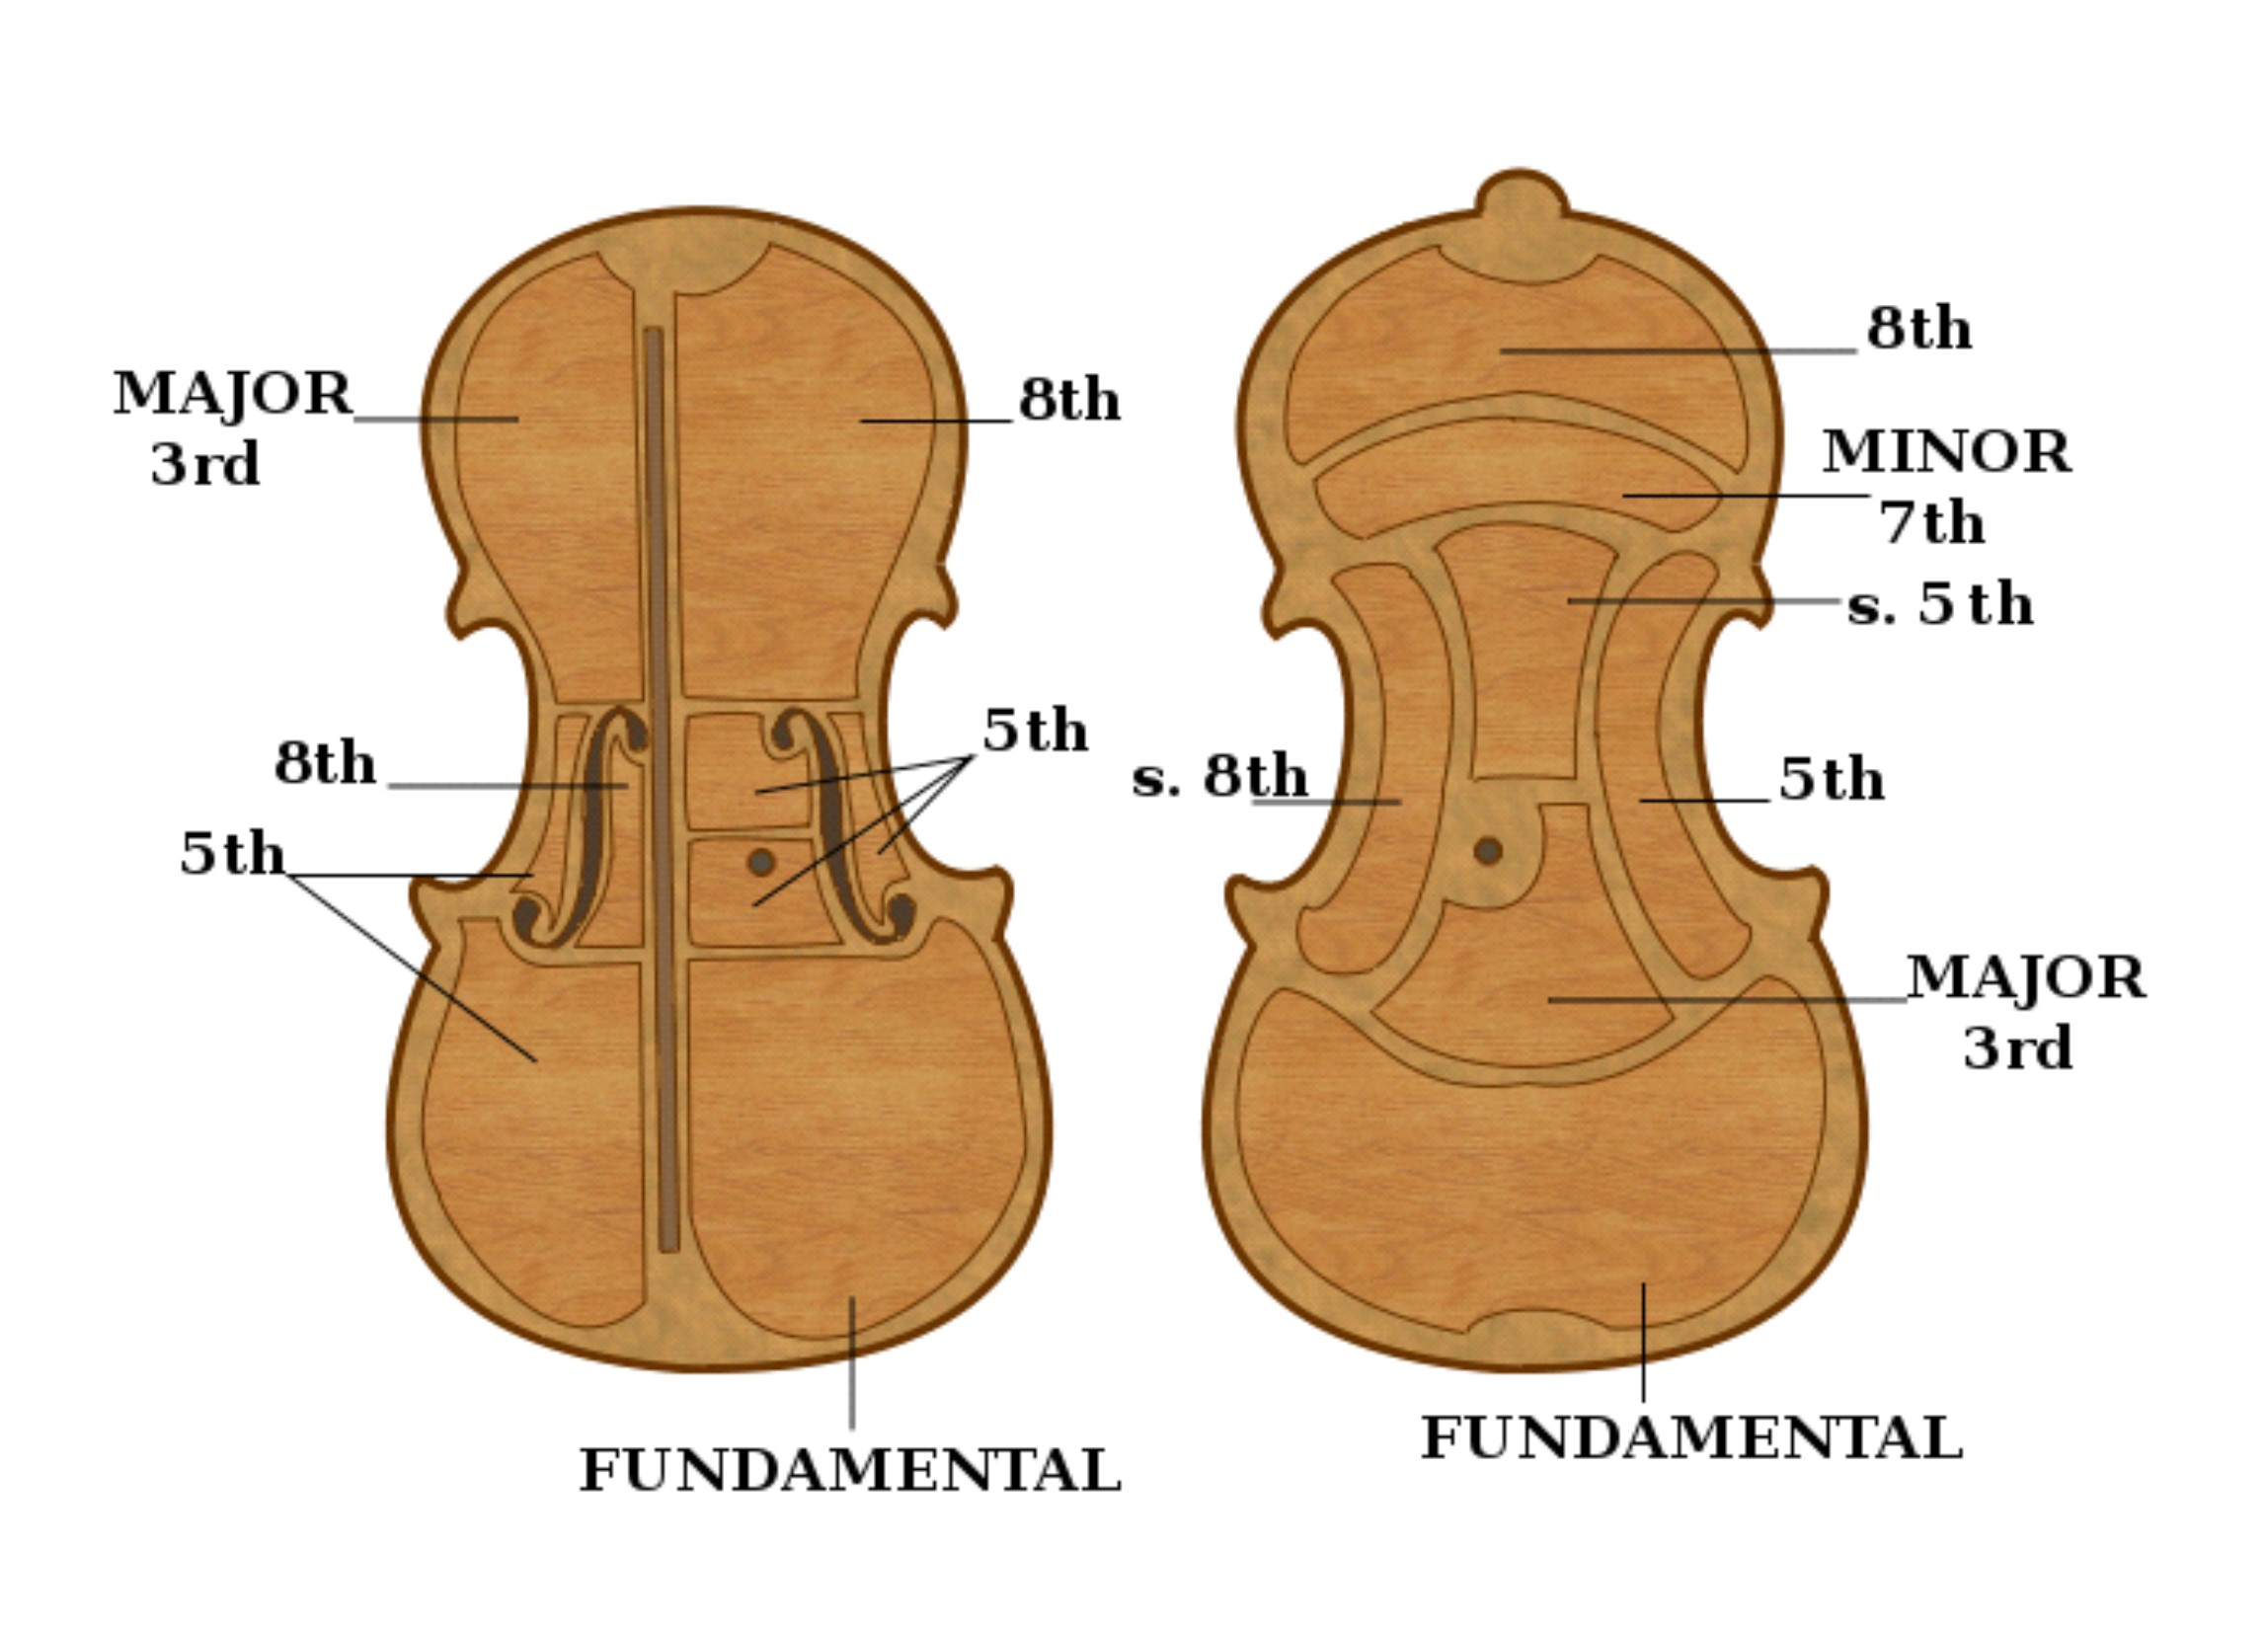 edited to a .pdf document here to make more of a narrative (and remove the name calling these forums suffer from). edited to a .pdf document here to make more of a narrative (and remove the name calling these forums suffer from).
Others for instance have tried area tuning (see this fascinating site of Keith Hill’s and one here too - figure right) and the ‘Vigdorchik strip’ tap tuning (see David Langsather’s example here) which I think has great possibilities, but you will need a lot of faith, patience, and a very, very good ear to do it: which I do not have.
And much of a lifetime.
Violin family plate weights.
Just as important as the tap tones of plates are their weights! Low weights are good weights.
The ‘reference’ weight of each plate is as follows in Table 3 below : This includes the standard or reference weight of violin, viola, ‘cello plates, and includes the ‘Tenor Violin’, which has plates (but not bout heights) very similar to those of a 1/2 size ‘cello.
This table may help you understand how good your plates are!
|
TABLE 3:
[see Ref. 3 below]
Instrument
|
Back length
in mm.
|
Back length
in inches (“)
|
Reference Belly weight.
in grams
|
Reference Back weight.
in grams
|
|
1/2 size violin
|
300
|
11.8”
|
41.7
|
73.1
|
|
3/4 violin
|
330
|
13.0
|
53.1
|
91.1
|
|
4/4 violin
|
357
|
14.1”
|
64.7
|
109.3
|
|
15 1/4" viola
|
387
|
15.2
|
79
|
132
|
|
15 1/2" viola
|
394
|
15.5
|
83
|
137
|
|
16" viola
|
406
|
16.0”
|
90
|
147
|
|
16 1/2" viola
|
419
|
16.5
|
97
|
158
|
|
|
|
|
|
|
|
'Cello, 1/4 size
|
580
|
22.8
|
221
|
336
|
|
'Cello,1/2 (half) size
|
650
|
25.6
|
295
|
437
|
|
Tenor Violin
|
654
|
25.7”
|
300
|
443
|
|
'Cello, 3/4 size
|
690
|
27.2
|
343
|
502
|
|
'Cello, 7/8 size
|
720
|
28.3
|
382
|
554
|
|
'Cello 4/4
|
760
|
29.9”
|
438.2
|
627.8
|
|
This Table 3 (above) is derived simply from taking the 2 known plate reference weights: violin and ‘cello, and assuming a straight power relationship between them. So plate weight = (plate length/reference plate length)^2.53 for each belly plate, plate weight = (plate length/reference plate length)^2.31for each back plate with suitable constants.
The plate shapes for all the instruments are assumed to be all very similar.
David Langsather gives very low plate weights of 54 gm front with bass bar, and an incredible 86 grams back. Stradivarius’ bellies, with bass bar & varnish, are also typically low at 58 - 70 gm. Dr. Harris uses heavier plates, typically 65 gm front and 109 gm. back before ff’s and varnish.
|
